Circuit based on IR control of transistors. A simple infrared control circuit. Explanations for the code
IR receivers of infrared radiation have become widespread in television, household, medical equipment and other equipment. They can be seen in almost any type of electronic equipment; they are controlled using a remote control.

Typically, an IR receiver microassembly has three or more pins. One is common and is connected to the power supply minus GND, the other to the plus V s, and the third is the output of the received signal Out.

Unlike a standard IR photodiode, an IR receiver is capable of not only receiving, but also processing an infrared signal in the form of pulses of a fixed frequency and a given duration. This protects the device from false alarms, background radiation and interference from other household appliances emitting in the IR range. Fluorescent energy-saving lamps with an electronic ballast circuit can create quite strong interference for the receiver.
The microassembly of a typical IR radiation receiver includes: PIN photodiode, variable amplifier, bandpass filter, amplitude detector, integrating filter, threshold device, output transistor

A PIN photodiode is from the family of photodiodes, in which another region of its own semiconductor (i-region) is created between the n and p regions - this is essentially a layer of pure semiconductor without impurities. It is this that gives the PIN diode its special properties. In the normal state, no current flows through the PIN photodiode, since it is connected to the circuit in the opposite direction. When electron-hole pairs are generated in the i-region under the influence of external IR radiation, current begins to flow through the diode. Which then goes to a variable amplifier.
Then the signal from the amplifier goes to a bandpass filter that protects against interference in the IR range. The bandpass filter is set to a strictly fixed frequency. Typically, filters are used that are set to a frequency of 30; 33; 36; 36.7; 38; 40; 56 and 455 kilohertz. In order for the signal emitted by the remote control to be received by the IR receiver, it must be modulated with the same frequency to which the filter is configured.
After the filter, the signal goes to an amplitude detector and an integrating filter. The latter is necessary to block short single signal bursts that may appear from interference. Next, the signal goes to the threshold device and the output transistor. For stable operation, the amplifier's gain is adjusted by an automatic gain control (AGC) system.

The housings of IR modules are made of a special shape that facilitates focusing of the received radiation onto the sensitive surface of the photocell. The housing material transmits radiation with a strictly defined wavelength from 830 to 1100 nm. Thus, the device uses an optical filter. To protect internal elements from external influences. fields an electrostatic screen is used.
Below we will consider the operation of an IR receiver circuit, which can be used in many amateur radio developments.
There are different types and designs of IR receivers depending on the wavelength, voltage, packet of transmitted data, etc.
When using a circuit in combination with an infrared transmitter and receiver, the wavelength of the receiver must necessarily match the wavelength of the IR transmitter. Let's consider one of these schemes.

The circuit consists of an IR phototransistor, a diode, a field effect transistor, a potentiometer and an LED. When the phototransistor receives any infrared radiation, current flows through it and the field effect transistor turns on. Next, the LED lights up, instead of which another load can be connected. A potentiometer is used to control the sensitivity of the phototransistor.
Checking the IR Receiver |
Since the IR signal receiver is a specialized microassembly, in order to ensure its operation it is necessary to apply a supply voltage to the microcircuit, usually 5 volts. The current consumption will be about 0.4 - 1.5 mA.
If the receiver does not receive a signal, then in the pauses between bursts of pulses the voltage at its output practically corresponds to the supply voltage. It's between GND and the output signal output can be measured using any digital multimeter. It is also recommended to measure the current consumed by the microcircuit. If it exceeds the standard one (see the reference book), then most likely the microcircuit is defective.
So, before starting the module test, be sure to determine the pinout of its outputs. Usually this information is easy to find in our mega-directory of electronics datasheets. You can download it by clicking on the picture on the right.
Let's check it on the TSOP31236 chip; its pinout corresponds to the figure above. We connect the positive terminal from the homemade power supply to the positive terminal of the IR module (Vs), and the negative terminal to the GND terminal. And we connect the third OUT pin to the positive probe of the multimeter. We connect the negative probe to the common GND wire. Switch the multimeter to DC voltage mode at 20 V.

As soon as packets of infrared pulses from the IR microassembly begin to arrive at the photodiode, the voltage at its output will drop by several hundred millivolts. In this case, it will be clearly visible how the value on the multimeter screen decreases from 5.03 volts to 4.57. If we release the remote control button, the screen will again display 5 volts.
As you can see, the IR radiation receiver responds correctly to the signal from the remote control. This means the module is OK. In a similar way, you can check any modules in an integrated design.

Integrated infrared radiation receivers are widely used in household electronic equipment. In another way they are also called IR modules.
They can be found in any electronic device that can be controlled using a remote control.
Here, for example, is an IR receiver on a TV circuit board.

Despite the apparent simplicity of this electronic component, it is a specialized integrated circuit designed to receive an infrared signal from remote controls. As a rule, an IR receiver has at least 3 pins. One pin is common and is connected to minus «-» food ( GND), the other serves as positive «+» output ( Vs), and the third is the output of the received signal ( Out).
Unlike a conventional infrared photodiode, an IR receiver can receive and process an infrared signal, which is an IR pulse of a fixed frequency and a certain duration - a burst of pulses. This technological solution eliminates random activations that can be caused by background radiation and interference from other devices emitting in the infrared range.

For example, fluorescent lighting lamps with electronic ballast can cause strong interference to the IR signal receiver. It is clear that using an IR receiver instead of a conventional IR photodiode will not work, because the IR module is a specialized microcircuit tailored for specific needs.
In order to understand the principle of operation of the IR module, let’s look at its structure in more detail using a block diagram.
The IR receiver chip includes:
PIN photodiode
Adjustable amplifier
Bandpass filter
Amplitude detector
Integrating filter
Threshold device

PIN photodiode is a type of photodiode in which between the regions n And p there is a region of its own semiconductor ( i-area ). The intrinsic semiconductor region is essentially a layer of pure semiconductor without impurities introduced into it. It is this layer that gives the PIN diode its special properties. By the way, PIN diodes (not photodiodes) are actively used in microwave electronics. Take a look at your mobile phone, it also uses a PIN diode.
But, let's return to the PIN photodiode. In the normal state, no current flows through the PIN photodiode, since it is connected to the circuit in the opposite direction (in the so-called reverse bias). Since under the influence of external infrared radiation in i-areas electron-hole pairs arise, and as a result, current begins to flow through the diode. This current is then converted into voltage and supplied to adjustable amplifier.
Next, the signal from the adjustable amplifier goes to band pass filter. It serves as protection against interference. The bandpass filter is tuned to a specific frequency. Thus, IR receivers mainly use bandpass filters tuned to a frequency of 30; 33; 36; 36.7; 38; 40; 56 and 455 kilohertz. In order for the signal emitted by the remote control to be received by the IR receiver, it must be modulated at the same frequency to which the IR receiver's bandpass filter is set. This is, for example, what a modulated signal from an infrared emitting diode looks like (see figure).

And this is what the signal looks like at the output of the IR receiver.

It is worth noting that the selectivity of the bandpass filter is low. Therefore, an IR module with a 30 kilohertz filter can easily receive a signal with a frequency of 36.7 kilohertz or more. True, at the same time, the distance of reliable reception is noticeably reduced.
After the signal has passed through the bandpass filter, it is sent to amplitude detector And integrating filter. An integrating filter is needed to suppress short single signal bursts that may be caused by interference. Next, the signal goes to threshold device, and then on output transistor.
For stable operation of the receiver, the gain of the adjustable amplifier is controlled by an automatic gain control system ( AGC). Since the useful signal is a packet of pulses of a certain duration, due to the inertia of the AGC, the signal has time to pass through the amplification path and the remaining nodes of the circuit.
In the case when the duration of a burst of pulses is excessive, the AGC system is triggered and the receiver stops receiving the signal. This situation can arise when the IR receiver is illuminated by a fluorescent lamp with an electronic ballast that operates at frequencies of 30 - 50 kilohertz. In this case, the modulated infrared radiation of the lamp’s mercury vapor can pass through the protective bandpass filter of the photodetector and trigger the AGC. Naturally, the sensitivity of the IR receiver decreases.
Therefore, you should not be surprised when the TV photoreceiver does not accept commands from the remote control well. Perhaps he is simply disturbed by the illumination of fluorescent lamps.
Automatic threshold adjustment ( ARP) performs a similar function as the AGC, controlling the threshold of the threshold device. The ARP sets the response threshold level in such a way as to reduce the number of false pulses at the module output. In the absence of a useful signal, the number of false pulses can reach 15 per minute.
The shape of the IR module body helps focus the received radiation onto the sensitive surface of the photodiode. The material of the housing transmits radiation with a wavelength from 830 to 1100 nm. Thus, the device implements an optical filter. To protect the receiver elements from external electric fields, an electrostatic shield is installed in the module. The photo shows IR modules of the brand HS0038A2 And TSOP2236. For comparison, conventional IR photodiodes are shown nearby. KDF-111V And FD-265.
IR receivers
How to check if the IR receiver is working properly?
Since the IR signal receiver is a specialized microcircuit, in order to reliably check its serviceability it is necessary to apply supply voltage to the microcircuit. For example, the nominal supply voltage for “high voltage” IR modules of the TSOP22 series is 5 volts. The current consumption is a few milliamps (0.4 - 1.5 mA). When connecting power to the module, it is worth considering the pinout.
In a state when no signal is supplied to the receiver, as well as in pauses between bursts of pulses, the voltage at its output (without load) is almost equal to the supply voltage. The output voltage between the ground pin (GND) and the signal output pin can be measured using a digital multimeter. You can also measure the current consumed by the module. If the current consumption exceeds the typical one, then the module is most likely faulty.
Read about how to check the serviceability of the IR receiver using a power supply, multimeter and remote control.
As you can see, IR signal receivers used in infrared remote control systems have a fairly sophisticated design. These photodetectors are often used by microcontroller technology enthusiasts in their homemade devices.
Below are schematic diagrams and articles on the topic “IR rays” on the radio electronics and radio hobby website.
What are “IR rays” and where is it used, schematic diagrams of homemade devices that relate to the term “IR rays”.
Schematic diagram. Like the previous version, this transmitter provides a short range (up to 10 m). In addition, the LEDs used as emitters are directional, which allows you to control the model only within the irradiation zone... IR pulses modulated by the command signal are supplied to the photodiode VD1. The changing current of the photodiode through the emitter follower VT2 is supplied to the input of the three-stage amplifier VT3-VT5. On transistor VT1 there is a unit for compensating for interference from... In this shooting range they shoot pulses of infrared radiation. The gun contains a power source and a DC voltage converter into rectangular pulses, the duration and amplitude of which are determined by the capacitance of capacitors C2-C5. A packet of pulses arrives at the infrared emitter... Wireless headphones allow you to receive the sound of a TV, radio, or tape recorder within one medium-sized room. The device operates based on the transmission of a frequency-modulated light signal in the infrared range. The kit contains... Thanks to the use of specialized coded integrated circuits, this device can be used to control the central locking of the car, the activation of the car alarm, garage doors, gates, lighting, etc. The kit consists of two parts: the transmitter and... The infrared receiver circuit is designed in such a way that it can work with any remote control: from a TV receiver, satellite tuner, VCR. The device works with most remote control buttons. The receiver operates as follows: a signal from the receiving diode... An optoelectronic barrier is used to protect objects. Thanks to it, you can turn on the alarm when an unauthorized person approaches the object. The barrier uses infrared radiation, the beam of which is transmitted from the transmitter to the receiver. Interruption of the beam causes a change in the output state... Standard remote control systems used in video technology are made on specialized microcircuits and provide a very large set of commands. But to control simple devices such a large number of commands is not required. In principle, even for operational control of a TV... The TRC1300N microcircuit is an encoder / decoder for remote control systems operating through a communication channel using infrared rays or via a radio channel. Depending on the logical level at pin 2 of the microcircuit, it works either as an encoder that generates pulse messages, or as a .. Light can be used as a medium for transmitting information. This can be ordinary (visible) light or infrared radiation - infrared rays. Schemes of simple optical transmitters for light telephones (photophones) using simple incandescent lamps are considered, as well as... Domestic semiconductor televisions of the USST line have already completely gone out of service, many have been thrown away and disassembled for parts. But some people still have completely working copies, used exclusively at the dacha. Indeed, our dachas are usually very poorly guarded (if at all... The device is designed to signal the passage of a person into the room through the front door or passage. The circuit works on the principle of crossing an infrared beam. When it crosses, a musical alarm is activated, warning staff that he has arrived visitor or customer... Diagram of a simple homemade photo sensor for monitoring objects on a conveyor. This device is designed to turn on the load when a box or box enters a certain area of the conveyor or conveyor belt, and turn off the load when the box leaves this area. The device is very ... Home-made sensor for the intersection or reflection of an IR beam on the K561LP2 chip. Many amateur radio automation circuits use infrared sensors for reflection or intersection of the beam, built on the basis of the element base of remote control systems for household radio-electronic... Scheme of a simple home-made set-top box connected to a COM port to control your computer using the remote control. A modern personal computer, with the necessary peripherals and software, can replace a home audio-video center. You must have... A diagram of a simple homemade border crossing or entry alarm using infrared rays. In some cases, it is necessary to signal the passage of a person into a room, the passage of a car into the territory, the movement or entry of an object into a box, box... Below is a description of a simple two-command remote control system using IR rays, which can be used to control various devices, as well as a security alarm and an electronic lock with remote control. The circuit is based on three LM567 microcircuits and one... The system is designed for independent control of four objects. The remote has four buttons and the receiver has four outputs. Each button on the remote control is responsible for its own receiver output; each button press changes the state of the corresponding receiver output. The receiver outputs are equipped with... Everyone knows why a microcalculator exists, but it turns out that in addition to mathematical calculations, it is capable of much more. Please note that if you press the “1” button, then “+” and then press “=”, then with each press of the “=” button the number on the display will be... The device is designed to turn on or switch something when brought to the sensor hands or other reflective surface. Sensitivity can be adjusted over a wide range, with the response range varying from several meters to several centimeters. The idea, in general...Yakorev Sergey
Introduction
There are many simple devices on the Internet based on controllers of the PIC16F and PIC18F family from Microchip. I bring to your attention a rather complex device. I think this article will be useful to everyone who writes programs for the PIC18F, since you can use the source code of the program to create your own real-time system. There will be plenty of information, starting from theory and standards, ending with hardware and software implementation of this project. The assembler source codes are provided with full comments. Therefore, it will not be difficult to understand the program.
Idea
As always, everything starts with an idea. We have a map of the Stavropol Territory. There are 26 districts of the region on the map. The size of the map is 2 x 3 m. It is necessary to control the illumination of the selected areas. Control must be carried out remotely via an infrared control channel, hereinafter referred to simply as IR or IR remote control. At the same time, control commands must be transmitted to the PC-based control server. When you select an area on the map, the management server displays additional information on the monitor. Using commands from the server, you can control the display of information on the map. The task has been set. In the end, we got what you see in the photo. But before all this was realized, we had to go through some stages and solve various technical problems.

View from the installation side.
Device operation algorithm
From the remote control, the information display control system should be no more difficult than selecting a program on TV or setting a track number on a CD. It was decided to take a ready-made remote control from a Philips VCR. The selection of a district number is set by sequentially pressing the remote control buttons “P+”, then two numeric buttons for the district number, ending with “P-”. When you select an area for the first time, it is highlighted (the LED backlight turns on), and when you select it again, the selection is removed.
Protocol for managing the card from the PC control server.
1. Outgoing commands, i.e. commands coming from the device to the PC:
1.1. When you turn on the power on the device, the PC receives the command: MAP999
1.2. When turning on an area: MAP(area number)1
1.3. When turning off an area: MAP(area number)0
1.4. When the entire map is turned on: MAP001
1.5. When turning off the entire map: MAP000
2. Incoming commands:
2.1. Enable entire map: MAP001
2.2. Turn off entire map: MAP000
2.3. Include area: MAP(area number)1
2.4. Disable area: MAP(area number)0
2.5. Receive information about included areas: MAP999 In response to this command, data about all included areas is transmitted in the format of clause 1.2 (as if all included areas are being turned on again).
2.6. Receive information about disabled areas: MAP995 In response to this command, data about all disabled areas is transmitted in the format of clause 1.3 (as if all disabled areas are switched off again).
When turning off the last enabled area, the command “turn off the entire map” should also be received.
When turning on the last unincluded area, the command “turn on the entire map” should also be received.
The area number is ASCII digit characters (0x30-0x39).
From idea to implementation
Anticipating that making your own housing for the remote control could be a rather difficult problem, it was decided to take a ready-made remote control from a serial device. The IR control command system of the RC5 format was chosen as the basis for the IR control system. Currently, infrared remote control (RC) is widely used to control various equipment. Perhaps the first type of household equipment to use IR remote control was televisions. Nowadays, remote control is available in most types of household audio and video equipment. Even portable music centers have recently been increasingly equipped with a remote control system. But household appliances are not the only area of application for remote control. Devices with remote control are quite widespread both in production and in scientific laboratories. There are quite a lot of incompatible IR remote control systems in the world. The most widely used system is the RC-5. This system is used in many televisions, including domestic ones. Currently, different factories produce several modifications of RC-5 remote controls, and some models have quite a decent design. This allows you to get a homemade device with IR remote control at the lowest cost. Skipping the details of why this particular system was chosen, let’s consider the theory of building a system based on the RC5 format.
Theory
To understand how the control system works, you need to understand what the signal at the output of the IR remote control is.
The RC-5 infrared remote control system was developed by Philips for the needs of controlling household appliances. When we press the remote control button, the transmitter chip is activated and generates a sequence of pulses that have a filling frequency of 36 KHz. LEDs convert these signals into infrared radiation. The emitted signal is received by a photodiode, which again converts the IR radiation into electrical impulses. These pulses are amplified and demodulated by the receiver chip. They are then fed to the decoder. Decoding is usually done in software using a microcontroller. We will talk about this in detail in the section on decoding. The RC5 code supports 2048 commands. These teams make up 32 groups (systems) of 64 teams each. Each system is used to control a specific device such as a TV, VCR, etc.
At the dawn of the development of IR control systems, signal generation took place in hardware. For this purpose, specialized ICs were developed, and now, increasingly, remote controls are made based on a microcontroller.
One of the most common transmitter chips is the SAA3010 chip. Let's briefly look at its characteristics.
- Supply voltage - 2 .. 7 V
- Current consumption in standby mode - no more than 10 µA
- Maximum output current - ±10 mA
- Maximum clock frequency - 450 KHz
The block diagram of the SAA3010 chip is shown in Figure 1.

Figure 1. Block diagram of the SAA3010 IC.
The description of the pins of the SAA3010 chip is given in the table:
| Conclusion | Designation | Function |
| 1 | X7 | Button matrix input lines |
| 2 | SSM | Operating mode selection input |
| 3-6 | Z0-Z3 | Button matrix input lines |
| 7 | MDATA | Modulated output, 1/12 cavity frequency, 25% duty cycle |
| 8 | DATA | Output |
| 9-13 | DR7-DR3 | Scan outputs |
| 14 | VSS | Earth |
| 15-17 | DR2-DR0 | Scan outputs |
| 18 | O.S.C. | Generator input |
| 19 | TP2 | Test input 2 |
| 20 | TP1 | Test input 1 |
| 21-27 | X0-X6 | Button matrix input lines |
| 28 | VDD | Supply voltage |
The transmitter chip is the basis of the remote control. In practice, the same remote control can be used to control several devices. The transmitter chip can address 32 systems in two different modes: combined and single system mode. In combined mode, the system is selected first, and then the command. The number of the selected system (address code) is stored in a special register and a command related to this system is transmitted. Thus, to transmit any command, successive pressing of two buttons is required. This is not entirely convenient and is only justified when working simultaneously with a large number of systems. In practice, the transmitter is more often used in single system mode. In this case, instead of the matrix of system selection buttons, a jumper is mounted, which determines the system number. In this mode, transmitting any command requires pressing only one button. By using the switch, you can work with multiple systems. And in this case, only one button press is required to transmit the command. The command transmitted will be related to the system that is currently selected using the switch.
To enable the combined mode, the SSM (Single System Mode) transmitter pin must be applied low. In this mode, the transmitter IC operates as follows: During rest, the X and Z lines of the transmitter are driven high by internal p-channel pull-up transistors. When a button in the X-DR or Z-DR matrix is pressed, the keyboard debounce cycle is initiated. If the button is closed for 18 clock cycles, the “generator enable” signal is fixed. At the end of the debouncing cycle, the DR outputs are turned off and two scan cycles are started, turning on each DR output in turn. The first scan cycle detects the Z address, the second scan detects the X address. When the Z-input (system matrix) or X-input (command matrix) is detected in the zero state, the address is latched. When you press a button in the system matrix, the last command is transmitted (i.e., all command bits are equal to one) in the selected system. This command is transmitted until the system select button is released. When a button is pressed in the command matrix, the command is transmitted along with the system address stored in the latch register. If the button is released before transmission begins, a reset occurs. If the transfer has begun, then regardless of the state of the button, it will be completed completely. If more than one Z or X button is pressed at the same time, the generator will not start.
To enable single system mode, the SSM pin must be high and the system address must be set with the appropriate jumper or switch. In this mode, the X-lines of the transmitter are in a high state during rest. At the same time, the Z-lines are turned off to prevent current consumption. In the first of two scan cycles, the system address is determined and stored in a latch register. In the second cycle, the command number is determined. This command is sent along with the system address stored in the latch register. If there is no Z-DR jumper, then no codes are transmitted.
If the button is released between code transmissions, a reset occurs. If the button is released during the debounce procedure or while the sensor is being scanned, but before a button press is detected, a reset also occurs. Outputs DR0 - DR7 have an open drain, and the transistors are open at rest.
The RC-5 code has an additional control bit that is inverted each time the button is released. This bit informs the decoder whether the button is being held down or a new press has occurred. The control bit is inverted only after a completely completed transmission. Scanning cycles are performed before each sending, so even if you change the pressed button to another during the sending of a parcel, the system number and commands will still be transmitted correctly.
The OSC pin is a 1-pin oscillator input/output and is designed to connect a ceramic resonator at a frequency of 432 KHz. It is recommended to connect a resistor with a resistance of 6.8 Kom in series with the resonator.
Test inputs TP1 and TP2 must be connected to ground during normal operation. When the logic level on TP1 is high, the scanning frequency increases, and when the logic level on TP2 is high, the frequency of the shift register is increased.
At rest, the DATA and MDATA outputs are in the Z-state. The pulse sequence generated by the transmitter at the MDATA output has a filling frequency of 36 kHz (1/12 of the clock generator frequency) with a duty cycle of 25%. The same sequence is generated at the DATA output, but without padding. This output is used when the transmitter chip acts as a controller for the built-in keyboard. The signal at the DATA output is completely identical to the signal at the output of the remote control receiver microcircuit (but unlike the receiver, it does not have inversion). Both of these signals can be processed by the same decoder. Using the SAA3010 as a built-in keyboard controller is very convenient in some cases, since the microcontroller uses only one interrupt input to poll a matrix of up to 64 buttons. Moreover, the transmitter microcircuit allows power supply voltage of +5 V.
The transmitter generates a 14-bit data word, the format of which is as follows:

Figure 2. RC-5 code data word format.
The start bits are for setting the AGC in the receiver IC. The control bit is a sign of a new press. The clock duration is 1.778 ms. As long as the button remains pressed, a data word is transmitted at intervals of 64 clock cycles, i.e. 113.778 ms (Fig. 2).
The first two pulses are the start pulses, and both are logical "1". Note that half the bit (empty) passes before the receiver determines the actual start of the message.
The extended RC5 protocol uses only 1 start bit. The S2 bit is transformed and added to the 6th bit of the command, forming a total of 7 command bits.
The third bit is the control bit. This bit is inverted whenever a key is pressed. In this way, the receiver can distinguish between a key that remains pressed or one that is pressed periodically.
The next 5 bits represent the IR device address, which is sent with the first LSB. The address is followed by 6 command bits.
The message contains 14 bits and, together with the pause, has a total duration of 25.2 ms. Sometimes the message may be shorter because the first half of the S1 start bit is left blank. And if the last bit of the command is a logical "0", then the last part of the message bit is also empty.
If the key remains pressed, the message will repeat every 114 ms. The control bit will remain the same in all messages. This is a signal for the receiver software to interpret this as an auto-repeat function.
To ensure good noise immunity, two-phase coding is used (Fig. 3).

Figure 3. Coding "0" and "1" in RC-5 code.
When using the RC-5 code, you may need to calculate the average current draw. This is quite easy to do if you use Fig. 4, which shows the detailed structure of the parcel.

Figure 4. Detailed structure of the RC-5 package.
To ensure the equipment responds equally to RC-5 commands, the codes are distributed in a very specific way. This standardization allows transmitters to be designed to control a variety of devices. With the same command codes for the same functions in different devices, a transmitter with a relatively small number of buttons can control, for example, an audio system, a television and a VCR simultaneously.
System numbers for some types of household equipment are given below:
0 - Television (TV)
2 - Teletext
3 - Video data
4 - Video Player (VLP)
5 - Video cassette recorder (VCR)
8 - Video tuner (Sat.TV)
9 - Video camera
16 - Audio preamp
17 - Tuner
18 - Tape recorder
20 - Compact player (CD)
21 - Turntable (LP)
29 - Lighting
The remaining system numbers are reserved for future standardization or experimental use. The correspondence of some command codes and functions has also been standardized.
Command codes for some functions are given below:
0-9 - Digital values 0-9
12 - Standby mode
15 - Display
13 - mute
16 - volume +
17 - volume -
30 - forward search
31 - search back
45 - ejection
48 - pause
50 - rewind
51 - fast forward
53 - playback
54 - stop
55 - entry
In order to build a complete IR remote control based on the transmitter chip, you also need an LED driver that is capable of providing a large pulse current. Modern LEDs operate in remote controls at pulse currents of about 1 A. It is very convenient to build an LED driver on a low-threshold (logic level) MOS transistor, for example, KP505A. An example of a circuit diagram of the remote control is shown in Fig. 5.

Figure 5. Schematic diagram of the RC-5 remote control.
The system number is set by a jumper between pins Zi and DRj. The system number will be as follows:
The command code that will be transmitted when a button is pressed that closes the Xi line with the DRj line is calculated as follows:
The IR remote receiver must recover bi-phase encoded data and must respond to large, rapid changes in signal strength regardless of interference. The pulse width at the receiver output should differ from the nominal by no more than 10%. The receiver must be insensitive to constant external light. Satisfying all these requirements is quite difficult. Older implementations of an IR remote control receiver, even those using specialized chips, contained dozens of components. Such receivers often used resonant circuits tuned to 36 kHz. All this made the design difficult to manufacture and configure and required the use of good shielding. Recently, three-pin integrated IR remote control receivers have become widespread. In one package they combine a photodiode, a preamplifier and a driver. The output generates a regular TTL signal without padding at 36 KHz, suitable for further processing by the microcontroller. Such receivers are produced by many companies, these are SFH-506 from Siemens, TFMS5360 from Temic, ILM5360 from Integral software and others. Currently, there are more miniature versions of such microcircuits. Since in addition to RC-5 there are other standards that differ, in particular, in the fill frequency, there are integrated receivers for different frequencies. To work with the RC-5 code, you should select models designed for a fill frequency of 36 KHz.
As an IR remote control receiver, you can also use a photodiode with a shaper amplifier, which can be a specialized KR1568HL2 microcircuit. The diagram of such a receiver is shown in Figure 6.

Figure 6. Receiver based on the KR1568HL2 microcircuit.
For the information display control system, I chose an integrated IR remote control receiver. A highly sensitive PIN photodiode is installed in the TSOP1736 microcircuit as an optical radiation receiver, the signal from which is fed to the input amplifier, which converts the photodiode output current into voltage. The converted signal is fed to an amplifier with AGC and then to a bandpass filter, which separates signals with an operating frequency of 36 kHz from noise and interference. The selected signal is fed to a demodulator, which consists of a detector and an integrator. In the pauses between pulses, the AGC system is calibrated. This is controlled by a control circuit. Thanks to this design, the microcircuit does not respond to continuous interference even at the operating frequency. The active output level is low. The microcircuit does not require the installation of any external elements for its operation. All its components, including the photodetector, are protected from external interference by an internal electrical screen and filled with special plastic. This plastic is a filter that cuts off optical interference in the visible range of light. Thanks to all these measures, the microcircuit is characterized by very high sensitivity and a low probability of false signals. Nevertheless, integrated receivers are very sensitive to power supply noise, so it is always recommended to use filters, for example, RC. The appearance of the integrated photodetector and the location of the pins are shown in Fig. 7.

Figure 7. RC-5 integrated receiver.
Decoding RC-5
Since the basis of our device is the PIC18F252 microcontroller, we will decode the RC-5 code in software. The RC5 code reception algorithms offered on the network are mostly not suitable for real-time devices, such as our device. Most of the proposed algorithms use software loops to generate time delays and measurement intervals. This is not suitable for our case. It was decided to use interrupts based on the signal decline at the INT input of the PIC18F252 microcontroller, measure the timing parameters using TMR0 of the PIC18F252 microcontroller, the same timer generates an interrupt when the waiting time for the next pulse has expired, i.e. when there was a pause between two sendings. The demodulated signal from the output of the DA1 microcircuit is supplied to the INT0 input of the microcontroller, in which it is decrypted and the decrypted command is issued to shift registers to control the keys. The decryption algorithm is based on measuring the time intervals between interrupts of the PIC18F252 microcontroller. If you look closely at Figure 8, you will notice some features. So if the interval between interrupts of the PIC18F252 microcontroller was equal to 2T, where T is the duration of a single RC5 pulse, then the received bit can be 0 or 1. It all depends on what bit was before it. This is very clearly visible in the program below with detailed comments. The entire project is available for download and use for personal purposes. When reprinting, a link is required.
The IR receiver is a standard device that connects to the COM (RS-232) port and serves to remotely control the robot.
One of the possible IR receiver circuits. Any 5-volt infrared receiver used in household equipment (TVs) will be suitable for the IR receiver. For example: TSOP1836, IS1U60L, GP1U52X, SFH506-36 or our domestic TK1833. The KREN5A voltage stabilizer is necessary to power the IR receiver with 5 V voltage, because 12 volts are supplied from the 7th pin of the COM port. The resistor can be selected from the range of 3-5 kOhm, capacitor 4.7-10 μF. Any low power diode.
In the above diagram, the output signal is supplied to 1 pin of the COM port (DCD). This contact is not used by a standard mouse for a COM port, so if you do not have enough free COM port, this circuit can be used in parallel with a mouse (but not with a modem)! The output signal can be sent not only to the DCD, but also to other pins, such as CTS or DSR. All these parameters can be set in a program that works in the IR receiver. There are several program options, the most common is WinLIRC. I can also recommend using the Girder program.
Pinout and appearance of the main elements of the circuit

From left to right - two types of 5-volt IR receivers, and a KREN5A voltage stabilizer chip.
COM port pinout
Pinout and description of COM port contacts (25 pin).
The IR receiver plays an important role in our everyday life. With the help of this microcircuit, we are able to control modern household appliances, a TV, a stereo system, a car radio, and an air conditioner. This allows us to do this, the remote control (RC), let's take a closer look at its operation, circuit, purpose and testing. In the article, how to check the IR receiver yourself.
What is an IR receiver and how does it work?
This is an integrated circuit, its direct and main task is to receive and process the infrared signal, which is what the remote control emits. This signal is used to control the equipment.
This microcircuit is based on a pin photodiode, a special element, with a p-n junction and an i region between them, an analogue of the base of a transistor, as in a sandwich, so here is the abbreviation pin, a unique element in its own way.
It is turned on in reverse and does not allow electric current to pass through. The IR signal enters the i region, and it conducts current, converting it into voltage.

The next stages are an integrating filter, an amplitude detector, and at the finish line, output transistors await them.
As a rule, there is no particular point in buying a new IR receiver in a store, since it can be easily unsoldered from various electronic boards. If you are assembling a device for checking the remote control from scrap materials, without knowing the exact marking of the device, then you can determine the pinout yourself.

We will need a multimeter, a power supply or several batteries, connecting wires, installation can be done hanging.
It has three outputs, one is GND, plus 5 volts is supplied to the second, and the out signal comes out from the third. We connect the power to the first and second legs, respectively, and remove the voltage from the third.

It is in a state of waiting for a signal from the remote control, and on the multimeter we see five volts. We begin to switch channels or press other buttons by pointing the remote control at him.
If it is working, then the voltage will drop by about 0.5-1 volt. If everything happens as written here, the device is working, otherwise the element is faulty.
How to determine the pinout of an infrared receiver
For example, I took a microcircuit completely unknown to me, which was lying in a box with elements, the “minus” was determined by the point that is on the back of the element, the “plus” was experimentally determined through a resistor. I didn’t risk anything, since he was initially a worker, there was no hope.
To determine the pinout of the IR receiver, if it is soldered into the board, look at it, there may be pin markings. If nothing is written there, inspect the element itself, look for its name, and then look on the Internet for characteristics and data, this is a very competent way of doing things. Following the instructions, how to check the IR receiver yourself.
diagram from the magazine "Young Technician".
An interesting direction in radio electronics, which has supplemented this electronics with new advantages of “invisible” light (infrared light). So I propose a circuit of a simple (for example) receiver and transmitter based on infrared rays. Basis: operational amplifier k140ud7 (I have ud708 here), emitting and receiving IR photodiodes, ULF (k548un1a (b,c - indices) - for two channels) (although where to “turn on” the second channel of the amplifier is up to you to decide - the transmitter circuit is designed for one channel, i.e. mono). Power supply for the device: I generally recommend it with decent current stabilization (otherwise the “dandy” adapter irritates the background of the “network”). Method: the amplitude-modulated signal of the transmitter is amplified by the receiver 1000 times.
How the device works. I suggest you watch a short video testing the IR remote control “by ear”. You can quickly check the functionality and signal strength by sound.
IR receiver and IR transmitter circuit
When assembling, capacitors C1 and C2 should be as close to the amplifier as possible! You can connect high-impedance headphones to the output (low-impedance ones require a separate ULF). Photodiode FD7 (I have FD5.. some kind of “tablet” with a focusing lens - I don’t remember the exact name); 0.125W resistors: R1 and R4 set the signal amplification factor by 1000 times. The receiver is easy to set up: a photodiode is directed to a source of IR radiation, for example, a 220V-50Hz lamp: the filament will be fonit with a frequency of 50Hz or a TV remote control (video, etc.). The sensitivity of the receiver is high: it normally receives signals reflected from the walls .
The transmitter has AL107a IR LEDs: any will do. R2 2 kOhm, C1 1000μFx25V, C2 200μFx25V, any transformer too. Although it is quite possible to do without a transformer - supply an amplified audio signal to capacitor C2.
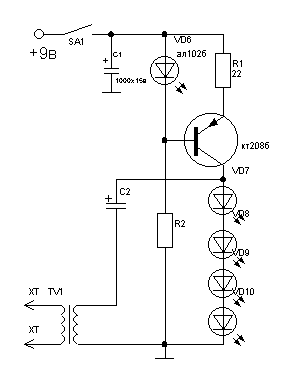
Device diagram
Recently, out of necessity, I assembled an IR receiver for testing IR remote controls (TVs and DVDs). After finalizing the circuit, I installed a mono ULF TDA7056. This amplifier has good gain characteristics of about 42 dB; operates in a voltage range from 3V to 18V, which allowed the IR receiver to operate even at a voltage of 3V; TDA gain range from 20 Hz to 20 kHz (UD708 passes up to 800 kHz) is quite enough to use the receiver as audio accompaniment; has short circuit protection on all “legs”; protection against "overheating"; weak self-interference coefficient. Overall, I liked this compact and reliable ULF (our price is 90 rubles).
There is to him with. Figure 1 shows an example of using an amplifier.

Photo TDA7056

Fig.1. Amplifier circuit with TDA7056
The result is an IR receiver, Fig. 2, which operates in the voltage range from 3V to 12V. I recommend using batteries or rechargeable batteries to power the receiver. When using a power supply, a stabilized source is required, otherwise the background of the 50Hz network will be heard, which amplifies the UD708. If the device is located near a source of mains voltage or radio emissions, interference may occur. To reduce interference, it is necessary to include capacitor C5 in the circuit. The TDA7056 is designed for a 16 Ohm output speaker, unfortunately I don’t have one. I had to use a 4 ohm 3 watt speaker, which was connected through a one watt 50 ohm resistor. Too low speaker coil resistance causes excess power and overheats the amplifier. In general, due to the additional resistor, the ULF does not heat up, but provides quite acceptable amplification.
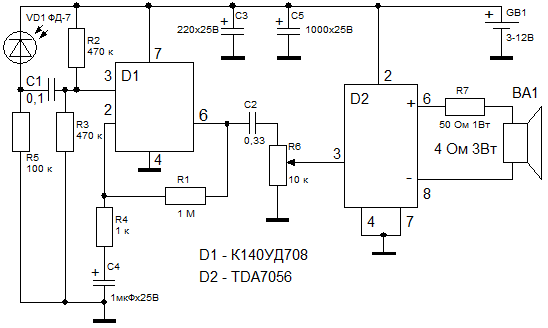
Fig.2. IR receiver circuit with ULF

Photo of IR receiver
In this lesson we will look at connecting an IR receiver to Arduino. We will tell you which library should be used for an IR receiver, demonstrate a sketch for testing the operation of an infrared receiver from a remote control, and analyze commands in C++ to receive a control signal.
IR receiver device. Principle of operation
Infrared radiation receivers are widely used in electronic technology due to their affordable price, simplicity and ease of use. These devices allow you to control devices using a remote control and can be found in almost any type of equipment.
The operating principle of an IR receiver. Processing the signal from the remote control
The IR receiver on Arduino is capable of receiving and processing an infrared signal in the form of pulses of a given duration and frequency. Typically, an IR receiver has three legs and consists of the following elements: a PIN photodiode, an amplifier, a bandpass filter, an amplitude detector, an integrating filter, and an output transistor.
Under the influence of infrared radiation in a photodiode, which has between p And n regions created an additional region of semiconductor ( i-region), current begins to flow. The signal goes to an amplifier and then to a bandpass filter, which protects the receiver from interference. Interference can be caused by any household appliance.
The bandpass filter is set to a fixed frequency: 30; 33; 36; 38; 40 and 56 kilohertz. In order for the signal from the remote control to be received by the Arduino IR receiver, the remote control must be at the same frequency as the filter in the IR receiver is set to. After the filter, the signal goes to an amplitude detector that integrates the filter and the output transistor.
How to connect an IR receiver to Arduino
The housings of infrared receivers contain an optical filter to protect the device from external electromagnetic fields; they are made of a special shape to focus the received radiation on a photodiode. To connect the IR receiver to the Arduino UNO, three legs are used, which are connected to the ports - GND, 5V and A0.
For this lesson we will need the following details:
- Arduino Uno board;
- Bread board;
- USB cable;
- IR receiver;
- Remote control;
- 1 LED;
- 1 resistor 220 Ohm;
- Wires "folder-folder" and "folder-female".
 Connection diagram of the IR receiver to the Arduino analog port
Connect the IR receiver according to the diagram and the LEDs to pins 12 and 13 and upload the sketch.
#include // connect the library for the IR receiver IRrecv irrecv(A0); // indicate the pin to which the IR receiver is connected decode_results results; void setup () // procedure setup ( irrecv.enableIRIn (); // start receiving an infrared signal pinMode(13, OUTPUT); // pin 13 will be the output pinMode(12, OUTPUT); // pin 12 will be the output pinMode(A0,INPUT); // pin A0 will be the input (eng. “intput”) Serial.begin(9600); // connect the port monitor) void loop () // procedure loop ( if (irrecv.decode (&results)) // if the data has arrived, execute the commands( Serial .println(results.value); // send the received data to the port // turn on and off the LEDs, depending on the received signal if (results.value == 16754775) ( digitalWrite (13, HIGH); ) if (results.value == 16769055) ( digitalWrite (13, LOW); ) if (results.value == 16718055) ( digitalWrite (12, HIGH); ) if (results.value == 16724175) ( digitalWrite (12, LOW); ) irrecv.resume (); // receive the next signal on the IR receiver } }
Explanations for the code:
- The IRremote.h library contains a set of commands and allows you to simplify the sketch;
- The decode_results statement assigns the variable name results to the received signals from the remote control.
What to pay attention to:
- To be able to control the inclusion of the LED, you need to turn on the port monitor and find out what signal is sent by this or that button on the remote control;
- The obtained data should be entered into the sketch. Change the eight-digit code in the sketch after the double equal sign if (results.value == 16769055) to your own.
IR receiver device, operation and testing
IR receivers of infrared radiation have become widespread in television, household, medical equipment and other equipment. They can be seen in almost any type of electronic equipment; they are controlled using a remote control.
operation and block diagram of the IR receiver |

Typically, an IR receiver microassembly has three or more pins. One is common and is connected to the power supply minus GND, the other to the plus V s, and the third is the output of the received signal Out.

Unlike a standard IR photodiode, an IR receiver is capable of not only receiving, but also processing an infrared signal in the form of pulses of a fixed frequency and a given duration. This protects the device from false alarms, background radiation and interference from other household appliances emitting in the IR range. Fluorescent energy-saving lamps with an electronic ballast circuit can create quite strong interference for the receiver.
The microassembly of a typical IR radiation receiver includes: PIN photodiode, variable amplifier, bandpass filter, amplitude detector, integrating filter, threshold device, output transistor

A PIN photodiode is from the family of photodiodes, in which another region of its own semiconductor (i-region) is created between the n and p regions - this is essentially a layer of pure semiconductor without impurities. It is this that gives the PIN diode its special properties. In the normal state, no current flows through the PIN photodiode, since it is connected to the circuit in the opposite direction. When electron-hole pairs are generated in the i-region under the influence of external IR radiation, current begins to flow through the diode. Which then goes to a variable amplifier.
Then the signal from the amplifier goes to a bandpass filter that protects against interference in the IR range. The bandpass filter is set to a strictly fixed frequency. Typically, filters are used that are set to a frequency of 30; 33; 36; 36.7; 38; 40; 56 and 455 kilohertz. In order for the signal emitted by the remote control to be received by the IR receiver, it must be modulated with the same frequency to which the filter is configured.
After the filter, the signal goes to an amplitude detector and an integrating filter. The latter is necessary to block short single signal bursts that may appear from interference. Next, the signal goes to the threshold device and the output transistor. For stable operation, the amplifier's gain is adjusted by an automatic gain control (AGC) system.

The housings of IR modules are made of a special shape that facilitates focusing of the received radiation onto the sensitive surface of the photocell. The housing material transmits radiation with a strictly defined wavelength from 830 to 1100 nm. Thus, the device uses an optical filter. To protect internal elements from external influences. fields an electrostatic screen is used.
Checking the IR Receiver |
Since the IR signal receiver is a specialized microassembly, in order to ensure its operation it is necessary to apply a supply voltage to the microcircuit, usually 5 volts. The current consumption will be about 0.4 - 1.5 mA.
If the receiver does not receive a signal, then in the pauses between bursts of pulses the voltage at its output practically corresponds to the supply voltage. It's between GND and the output signal output can be measured using any digital multimeter. It is also recommended to measure the current consumed by the microcircuit. If it exceeds the standard one (see the reference book), then most likely the microcircuit is defective.
So, before starting the module test, be sure to determine the pinout of its outputs. Usually this information is easy to find in our mega-directory of electronics datasheets. You can download it by clicking on the picture on the right.
Let's check it on the TSOP31236 chip; its pinout corresponds to the figure above. We connect the positive terminal from the homemade power supply to the positive terminal of the IR module (Vs), and the negative terminal to the GND terminal. And we connect the third OUT pin to the positive probe of the multimeter. We connect the negative probe to the common GND wire. Switch the multimeter to DC voltage mode at 20 V.

As soon as packets of infrared pulses begin to arrive at the photodiode of the IR microassembly, the voltage at its output will drop by several hundred millivolts. In this case, it will be clearly visible how the value on the multimeter screen decreases from 5.03 volts to 4.57. If we release the remote control button, the screen will again display 5 volts.
As you can see, the IR radiation receiver responds correctly to the signal from the remote control. This means the module is OK. In a similar way, you can check any modules in an integrated design.